Mitacs Plus User Guide
This guide provides step-by-step instructions for using Mitacs’s new Mitacs Plus platform. For more general information on our new platform and its audience, please click here.
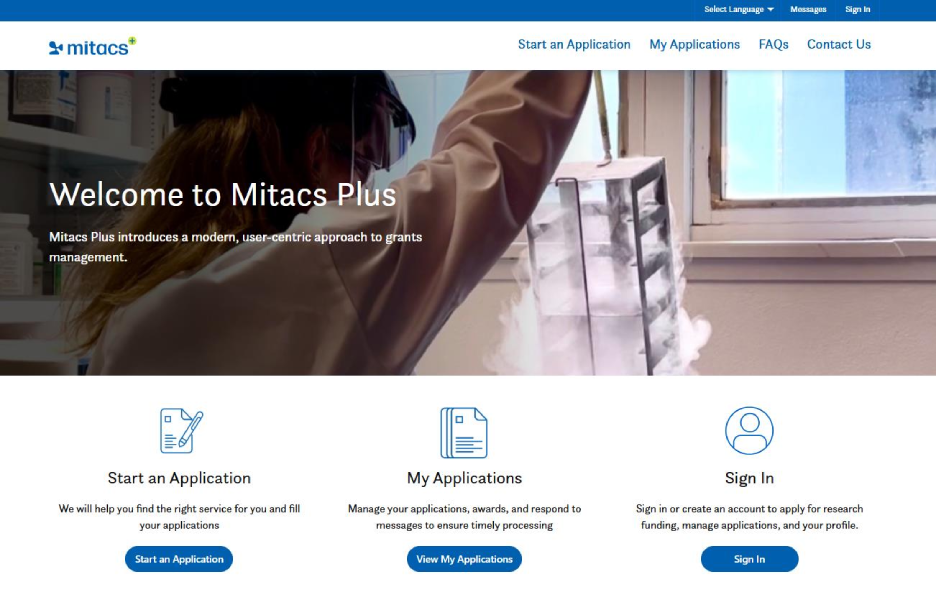
At the top of the homepage, you will find a language selector, message center and sign in options. Below this are options to start an application, view existing applications, browse FAQs, and contact Mitacs.
*Note – supported browsers include Edge, Chrome and Safari, all other browsers are not supported
- Existing users: Sign in using your credentials. (If you have an account on any of our other Mitacs platforms, except the GRI portal, you can use the same email address and password to access Mitacs Plus. You’ll still need to create a profile the first time you log in.)
If you’ve registered on another Mitacs system but your login does not work on Mitacs Plus, please proceed as a new user in this case. If you are having trouble, please contact us and we will be happy to help.

- New users: Click Create an Account and follow the prompts. You will receive a notification to go to your email and confirm your account. Clicking on the “Confirm your account” button in the email will lead you back to Mitacs Plus to complete your profile. If you do not see the confirmation email, please check your spam folder. If you still can not find the email, please contact us using the contact us option in the portal or email [email protected] for support.

- Invited users: If you’re being added as a contributor on an application, you’ll receive an invitation via email. Use the link to either sign in or redeem your invitation to create an account.


Profile Creation – Academic Supervisor
After signing in, fill in the required fields (Figure 1). Academic Supervisors will be asked to upload a resume. All eligible post-secondary institutions should be found in the Organization menu. If not, please contact us using the contact us option in the portal or email [email protected] for support.


Figure 1: Academic Supervisor Profile page
Profile Creation – Partner Organization
Once you have created an account, you can sign in and you will be prompted to enter your profile information (Figure 2). If your organization has previously worked with Mitacs, search for it in the Organization field. If it’s your first time, click “New” to add the organization details manually (Figure 3).

Figure 2: Partner Organization Profile page. You can search for your Partner Organization by clicking on the magnifying glass circled in red in the figure. If you are new to Mitacs, you can add your Partner Organization by clicking on the magnifying glass, and then clicking “New” in the pop up page (page that pops up in Figure 3 below).
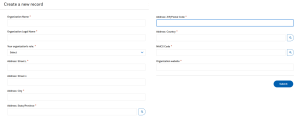
Figure 3: Create a new record page for new Partner Organizations.
Click “Start an Application”
Select “Begin Application”
You will be guided through multiple sections, including the project overview, research declarations, and contributors. Required fields are indicated by red asterisk *

a. Project Overview
Includes basic details about the project, such as title, discipline etc.

b. Research Declarations
Visible to all contributors, but only editable by the academic supervisor. Certain responses may trigger additional fields for clarification. ORS and Partner Organization roles have read-only access.
ORS/Partner Organization view (before Academic supervisor has filled in the form):

Academic Supervisor view:

c. Project Members
Adding participants to your project.

You may choose the role for your contributor, either Academic Advisor, Partner Organization or Grant Writer*, invite them to the applications by adding their name and email address, and you can choose what access they have to the application with the edit permissions. Please note that ORS Representative that is tagged to the Academic Supervisor’s institution will be automatically added to the application, no manual invitation is required. If none appears, or the wrong ORS Representative appears, please reach out using the contact us form option in the portal or email [email protected] for support.

*Grant Writer: is an optional additional contributor who will assist in the writing of the proposal but will not be a formal member of the application and will not be required to sign off. This individual may be an intern, a departmental admin or any other individual who you may want to assign this role. If the intended intern for the project is added on as a Grant Writer, please note this does not automatically make them the intern for the project. They will still need to be invited onto the project as an intern once the project has been submitted at the earliest.
d. Budget
Use this section to estimate the number of interns and their expected duration. The system will automatically calculate the proposed partner contribution.
See the screenshots below for an example, you will choose the estimated duration of the project as a whole, then add interns to the project, by adding their academic level, the type of internship either a 4 or 6 month, and their expected duration to be working on the project, based on the selections it will automatically calculate the number of internship units for that intern.

- PDF interns default to the $20K model
- All others default to the $15K model (4 months/unit at time of submission, but once an intern is added, the academic supervisor can adjust to be 6 month units)
- The $10K model is not available by default
If required, please reach out using the contact us option in the portal or email [email protected] to make the adjustment.

e. Billing Details
This section can only be filled out by the partner organization Academic Supervisors and Grant Writers will see the following screen:

Partner organizations will be asked to fill out the invoicing details as follows on this screen:

f. Research Project Proposal
Download and complete the proposal template. Upload the final version along with any supporting materials (tables, figures, etc.). You may reach out to your Mitacs BD advisor for proposal support prior to submission.

g. Partner Organization Additional Details
This is another section restricted to the partner organization, Academic Supervisors and Grant Writers will see the following:

Partner organizations will be asked to fill in the following information:

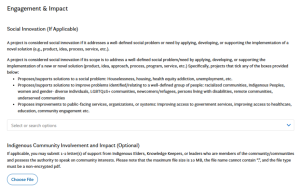
h. Engagement and Impact (Optional)
This section is available if your project involves social innovation or Indigenous Community engagement. You may upload letters of support if applicable.
i. Reviewers
Applicants need to suggest a minimum of six potential reviewers and flag any individuals to avoid (e.g., due to conflicts of interest).
For reviewer selection, they must arms-length, meaning:
- Be a recognized expert in the research topics and technical aspects covered by the proposal.
- NOT be from the same academic institution as the intern(s) or the academic supervisor(s).
- NOT have had any collaboration with the intern(s) or the academic supervisor(s) or the partner(s) during the past five years or planned for the near future.
Once your application is ready, click Sign Off. This will lock the application and send email notifications to all contributors, prompting them to sign off. Once all required participants have signed off, the ORS representative will be notified to complete the final sign off. Within 2 business days, a PDF download of the application will be available in the Document section. To view the PDF, please take the following steps:
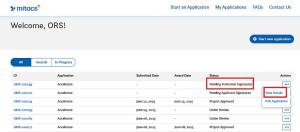
- Navigate to My Applications in the Mitacs Plus Portal.
- Find the application(s) at “Pending institutional Signatures”. From the Ellipses choose “View Details”
- Choose the Documents tab and under Generated Documents you will find the “SM Internal”PRIME PDF report. This is a full downloadable version of the application. Clicking on the blue hyperlink for that document will open it and allow the document to be downloaded and saved.


For any questions or difficulties in accessing this document please use the contact us option in the portal or email [email protected].
After ORS sign-off is complete, the application is automatically submitted to Mitacs for review.
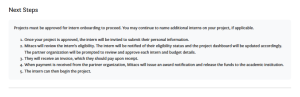
To onboard interns, the academic supervisor can start inviting them as soon as the application is submitted, or you can wait for the project to be approved. Note: the interns will only be notified and confirmed after project approval.
From the dashboard choose the application that you want to invite interns to, and either click the application id number (hyperlinked, or go to the ellipses and choose view application).

Then navigate to the internship details tab.

Select the intern unit from the proposed budget you would like to name and from the actions choose “Name Intern”. You will be asked to add their first name, last name, and email address. You will choose the distribution of funds for this internship, (i.e. research costs and stipend). Finally, you will choose the start date for the intern, and internship period (duration 4 or 6 months). Once all fields are completed, you will be asked to confirm the information.
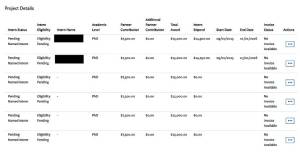
Once the project is approved, the Partner Organization has to approve the budget for the intern. They will need to follow the same steps as stated above to access the project and see the list of interns. Please note: These steps will have to be completed for each internship unit. After confirming one intern, return to the award details page to confirm any other named interns, as indicated by the 3 dots under the action column.

The next steps will be for the intern to receive the invitation and fill out their profile information (note: this will only be after project approval). Mitacs will review eligibility and confirm the intern’s eligibility after which an invoice to the partner will be issued for the internship.
Mitacs may send you portal messages regarding:
- Required updates
- Eligibility issues
- Revision requests
You will receive an email notification when a message is available.
Messages are available in the top navigation ribbon , which will take you to all messages ever sent on any application.

Or in the messages tab for messages on specific projects.

You will be able to view the messages and reply in the message tab.
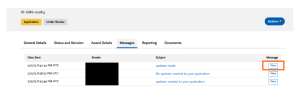
When viewing the message, the option to reply is available. New messages cannot be initiated from the portal, for all inquiries you should use the contact us option in the upper navigation ribbon.

The My Applications dashboard displays overall application statuses: Submitted, Under Review, Approved, etc.

For detailed status:
- Select View Details from the ellipsis menu on your application.
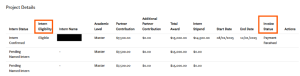
- Go to the Internship Details tab to see intern approvals and invoicing status.

You’ll find the following in the Documents section of each project:
- Your proposal template as submitted
- Review outcome letter
- Reviewer comments
- Award letter(s)
